Accessory Port
Complete guide to the OcuTrap Accessory Port: enabling and configuring the port, electrical specifications, safety guidelines, and common use cases.
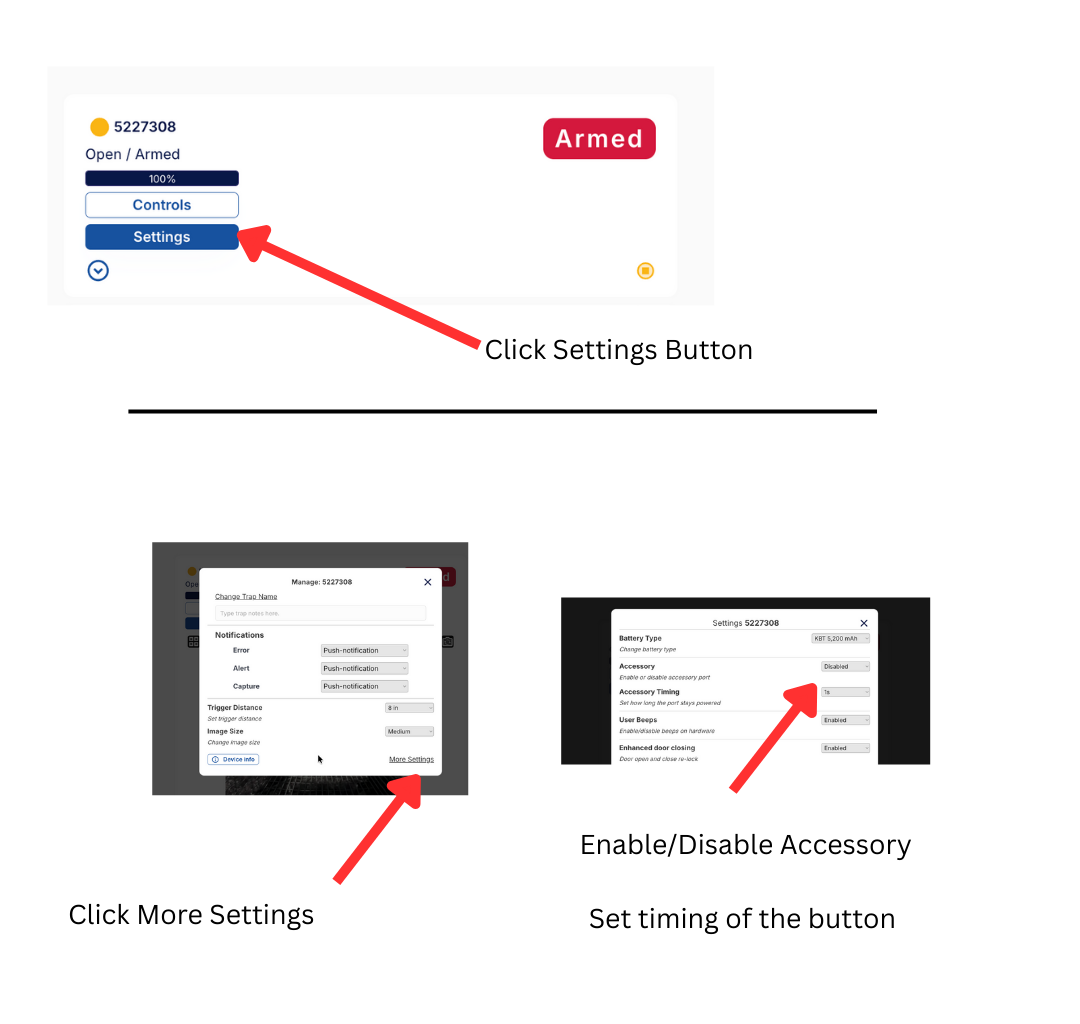
Modifying Settings: Enable, Disable, and Adjust
Learn how to manage your settings efficiently by enabling, disabling, or altering them as needed.
To use the button, simply click it to power the accessory.
The Accessory feature allows you to remotely power an external device connected to your OcuTrap, such as a buzzer, motor, solenoid, or other low-voltage accessory. Power is switched directly by the OcuTrap and is intended for short, controlled activations.
The accessory system consists of:
- A software-controlled Accessory button in the Controls menu
- A physical 12V accessory port located on the OcuTrap pod
- Internal switching circuitry rated for up to 3.0A continuous current
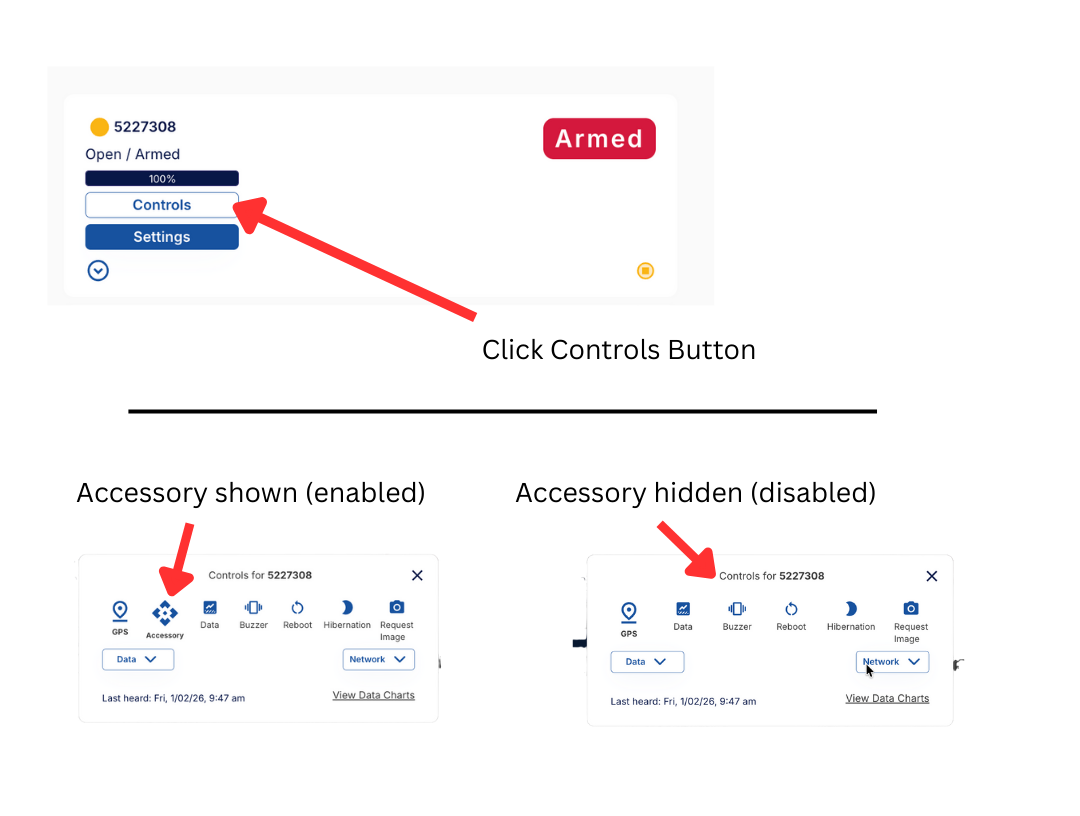
Accessory Button Behavior
The Accessory button appears in the Controls panel when the accessory port is enabled.
When the button is visible
- The accessory port is enabled in Settings
- The device is online and able to receive commands
When the button disappears
- The accessory port is disabled in Settings
- This is expected behavior and helps prevent accidental activation
If you do not see the Accessory button, check that Accessory = Enabled in the device Settings -> More Settings menu.
Physical Port Location
The accessory port is located at the top of the OcuTrap pod.
- Output voltage: 12V DC
- Maximum continuous current: 3.0A
- Output type: Switched power controlled by OcuTrap firmware
This port is intended only for powering external accessories. It does not accept power input.
Electrical Specifications
| Parameter | Value |
|---|---|
| Output Voltage | 12V DC |
| Max Continuous Current | 3.0A |
| Default State | OFF |
Usage Guidelines
Polarity Sensitive
This port is not reversible.
- Pin 1: Switched Ground
- Pin 2: +12V Output
Always verify polarity before connecting an accessory. Incorrect wiring may damage the connected device or the OcuTrap.
Unidirectional Power Only
This port is designed exclusively to output power.
Do not:
- Back-feed voltage into the port
- Connect an external power supply to the accessory pins
Back-feeding power can permanently damage the trap.
Load Requirements
- Do not exceed 3.0A continuous current
- High-current loads may cause overheating or failure
- Short activation times are recommended for power-hungry accessories
If your accessory requires more current, use an external relay or driver circuit.
Motors and Solenoids
For motors, solenoids, or relays, use a relay or driver circuit rated for your accessory. Follow the accessory manufacturer's wiring instructions.
Failure to use proper wiring may damage the accessory or the trap.
Default OFF State
The accessory port stays OFF during startup and turns OFF if the control signal is lost, so accessories do not activate unexpectedly.
Common Use Cases
- External buzzers
- Solenoids or latches
- Low-power motors
- Custom accessories using the OcuTrap accessory port
Potential Automation Applications
The Accessory Port enables automation and remote activation for various external devices:
- Rebaiter / Feeder – Automatically dispense bait at specific intervals to keep the trap effective longer.
- Vaccine Feeder – Deliver oral vaccines to target animals, aiding in disease control efforts.
- Lure Dispenser – Release scent-based attractants to increase trapping efficiency for specific species.
Always test new accessories with short activations before regular use.
Important Safety Notes
Do Not Use the Accessory and Main Door Motor Simultaneously
- The accessory port and the main door motor should not be activated at the same time because both draw power from the same 12V battery.
- The trap door motor can momentarily draw up to 5A, and if an accessory is also in use, it can exceed the power supply limits.
- Result: Excessive current draw may cause:
- Device shutdown due to voltage drop
- Overheating and potential failure of the power circuit
- Reduced battery life
Accessory Shutdown When Door Motor is Operated
If the door motor is moved to an open or closed position while the accessory is running, the accessory will automatically power off. This behavior is an intentional safety feature designed to prevent potential conflicts between the door mechanism and the accessory. To avoid an unexpected shutdown, always ensure that the accessory is stopped before adjusting the door motor.
Timing Conflicts
- If the trap door is operating, avoid triggering the accessory at the same time.
- If using an automated system, set a delay between door operation and accessory activation in the app settings.
Troubleshooting
Accessory button missing
- Confirm the accessory port is enabled in Settings
- Refresh the page after changing settings
Accessory does not power on
- Verify wiring polarity
- Confirm current draw is below 3.0A
- Check that the device is online
Device resets or behaves unexpectedly
- Check that motors or solenoids are wired with a proper relay or driver circuit
- Check for short circuits or overcurrent conditions
If you have questions about a specific accessory or need help validating your setup, contact support@ocutrap.com before deployment.